Sunday, January 17, 2010

Honey Nut Cheesecake Squares

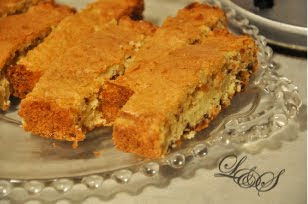
We covered dips and pizzas in our last two posts for Pace Picante Salsa and Philadelphia Cream Cheese, but there has been no attention in the kitchen paid to a Superbowl Party dessert. So, what gives? Sports fan love sweets too! It is highly unlike me to overlook the reason why most of us even eat vegetables in the first place; to earn the right to indulge in dessert. Making sure sweets have their place at your party's buffet table, the second recipe tested for LovemyPhilly.com is a re-working of Kraft's Philadelphia Holiday Desserts 2009 "Caramel-Nut Cheesecake" into my Honey Nut Cheesecake Squares.

Ingredients:
  • 2 cups Honey Maid Honey flavor graham crackers. 1 1/2 packages pulsed to a small crumb in a food processor = 2 cups.
  • 3/4 cup Planters Nutrition South Beach Diet Recommended Mix + a handful to decorate & chopped into small pieces.
  • 1/4 + 3/4 cups sugar
  • 7 tlbsp. unsalted butter melted
  • 3 pkg. (8oz. each) Philadelphia Cream Cheese: 2 Philadelphia Cream Cheese Honeynut flavor + 1 1/3 Less Fat Original Flavor.1 tsp vanilla extract
  • 1 cup Kraft Breakstone's Reduced Fat Sour Cream
  • 3 eggs
Instructions:
  1. Preheat the oven to 350F.
  2. Line a 13x9 inch pan with foil extending the foil on all sides beyond the rim of the baking dish. *I used the Perfect Brownie Pan Set.
  1. In a food processor, break-up 1 1/2 pkg. of graham crackers and pulse about 10 times, then left it run for 15 seconds until you have a small consistent crumb. Empty graham crumbs into a medium size mixing bowl. Put 3/4 Planters Nutrition Nut Mix into the food processor and repeat the small method until you have a small consistent crumb of nuts.
  2. Empty nuts into bowl with the graham cracker plus 1/4 sugar. Using your fingers blend the mixture thoroughly. Add the melted butter and mix through with your hands.
  3. Press the crust evenly into the dish. Reserve some to sprinkle on later as a topping.Bake crust for 10 minutes.
  4. Meanwhile, beat the cream cheese, 3/4 sugar, and vanilla with hand mixer until w
  5. ell blended. Add sour cream and mix-in. Add the eggs one at a time beating until just mixed in. Be careful not to over beat after adding the eggs! Over beating can lead to a cracked top.
  6. Pour over crust.
  7. Bake for 35 min. or until the center is almost set. Let cool 5 minutes.
  8. Sprinkle an evenly, thin layer of crumbs on top while still warm. Use your fingers to gently press the crumb topping into the cake. Garnish with silvers of chopped mix nuts or one nut. Chill for 4 hours before serving.

Saturday, January 16, 2010

Creamy Buffalo Chicken Dip & BBQ Pizza

As the Superbowl Season of party food favorites for rowdy and ravenous crowds continues, this post highlights what simple Philadelphia Cream Cheese-based dishes can be crowd pleasers for you and your party guests. Side dishes and finger food such as Salsa Rosemary Chevre Dip and Mexican Pizzas keep appetites (and hopefully also tempers) at bay while your main dish event perhaps of some slow-smoked ribs or burgers on the grill are getting ready to come in for some serious offensive eating. The key for the host or hostess with the mostess to churning out stellar side dishes and finger foods are one, ease of preparation and two, big flavor-boom. In a case of superb timing, LoveMyPhilly.com recently contacted me about testing recipes of my choosing from the Kraft Philadelphia Holiday Desserts pamphlet. Thanks to that window of opportunity I am able to present Creamy Buffalo Chicken Dip and BBQ Buffalo Chicken Pizzas.

Creamy Buffalo Chicken Dip
Adapted from the Kraft Philadelphia Holiday Desserts recipe "Easy Cheesy Buffalo Chicken Dip"
  • 1 pkg. (8oz.) Philadelphia 1/3 Less Fat Cream Cheese.
  • 1 1/2 cup finely chopped cooked chicken*if cooking chicken, see below.
  • 1/2 cup Blue Cheese Dressing**see homemade recipe below.
  • 1/2 cup buffalo wing sauce; 4 tblsp. butter melted and mixed with 1/4 cup hot sauce.
  • 3 green onion stems
  • Paprika & chili paste to increase heat.
*Optional. Cooking the chicken:1 1/2 cups of chicken = 6 raw tenderloins.
  • 2 tblsp olive oil
  • salt
  • black pepper
  • garlic powder

Bomb Blue Cheese Dressing
Yield - about 1/2 cup
  • 2.2 oz. blue cheese crumbles
  • 3 tblspn. buttermilk
  • 3 tblspn. Kraft Breakstone's Reduced Fat Sour Cream
  • 2 tblspn. cider vinegar
  • 1/4 tsp garlic powder
  • 1/2 tsp. sugar
  • 1/2 tsp. black pepper
  • 2 shakes of sea salt

Dressing Instructions:
  1. In a small bowl using a fork, mix the blue cheese crumbles and buttermilk together.
  2. Stir in sour cream, vinegar, sugar, black pepper, and the sea salt.
  3. You can make and refrigerate this ahead of time.

Dip Instructions:
  1. Cut small rings of the green onions until the pale green becomes white. Stop there.
  2. In a medium microwave safe bowl, mix all the ingredients of the dip and microwave on high for 3-5 min.
  3. ***Optional: Taste the dip and if you want to increase the spiciness, add 1/4 tsp. paprika and 1-2 tblsp. of a chili paste or chili sauce like Sriarchi.
  4. Stir and serve with celery and carrot sticks and/or crackers.


BBQ Buffalo Cheesy Chicken Pizza
Serving Size: 2 individual 8" pizza crusts, or 12 mini-slices for appetizers.
  • 2 8 in. Boboli Pizza Crusts
  • 6 tblsp. Kraft Spicy Honey Barbecue Sauce
  • 1/2 cup Kraft Cheddar Cheese Crumbles
  • 4-6 tblsp. Creamy Chicken Buffalo Dip
  • 1/4 cup finely chopped celery
  • 1/4 cup pre-cooked bacon pieces

Pizza Instructions:
  1. Preheat oven to 375F degrees.
  2. Spread 2-3 tblsp. of Kraft Spicy Honey Barbecue Sauce on each crust.
  3. Spread 2-3 tblsp. of Creamy Buffalo Chicken Dip over the bbq sauce.
  4. Sprinkle 1/4 of Kraft Cheddar Cheese Crumbles evenly over the dip and to the edge of the crust.
  5. Sprinkle pre-cooked bacon pieces evenly over the entire pizza.
  6. Place the pizza directly onto the top rack of the oven. Make sure a baking sheet or tinfoil is under the top rack to catch any debris.
  7. Cook for 25-30 minutes or until the crust is brown and the cheese is lightly browned.
  8. Let cool 5-7 minutes before cutting.
  9. Sprinkle with finely chopped celery and serve.

Friday, January 15, 2010

Pace Picante Salsa Dishes Spice up Your Superbowl Party

With the 2009 holiday season laid to rest its important to keep the celebratory spirit alive by menu planning for the 2010 Superbowl Party Season! I am a Philadelphia Eagles fan myself and even though they lost to the Dallas Cowboys (ugh, really?), I'm still all geared up with party food recipes made with the samples of Pace Picante Salsa provided to the Foodbuzz Tastemakers Program. Even though I won't be doing the touchdown dance for an Eagles victory, I still think my Pace Picante Salsa inspired dishes, Salsa Rosemary Chevre Dip & Mexican Pizzas, are not only winners-they're champions. Hut 1! Hut 2! Ready!? Set! Cook!


Salsa Rosemary Chevre Dip
Serving Size: 4-6. Double for more guests.
  • 1 tablespoon olive oil
  • 2 cloves garlic, peeled and chopped or pressed
  • 1 cup Pace Picanta Salsa
  • 2 tsp lemon juice
  • 2 tablespoon fresh rosemary, chopped
  • 2 tsp habanero hot sauce, or cayenne pepper
  • 2 tablespoon tomato paste
  • 4oz. of goat cheese or chevre
  • rosemary springs for garnish
  1. Heat the olive oil in a saute pan.
  2. Add the garlic and cook one minute.
  3. Add the Pace Picante Salsa, lemon juice, habanero hot sauce, chopped rosemary, and the tomato paste.
  4. Stir to combine and allow to simmer a few minutes to reduce.
  5. Spoon the mixture into an oven proof dish.
  6. Cut the goat cheese in medallions and line them in a diagnoal or vertical line splitting the mixture.
  7. Bake in a preheated 350 degree oven for 30 minutes.
  8. Let cool 3-4 mintues before serving.
  9. Garnish with fresh rosemary.
  10. Serve with crackers or slices of the baguette.


Mexican Pizza
  • Serving Size: 2 8" Boboli Mini Crust*
  • 4 tblsp. Pace Picante Salsa
  • 4 tblsp. Philadelphia Cream Cheese
  • 4 tblsp. Hormel Chili with no beans**
  • 1 cup cheddar cheese
  • 4-5 jalapeno slices per crust
  • 1/4 cup small chops of green peppers
  • *This recipe can easily be multiplied and varies in serving size according to your number of guests. If you're having a smaller get-together, perhaps each guest can be served their own individual 8" mini Mexican pizza. If you have a larger party, you can also use 12" crusts and cut slices to be served as snacks or appetizers.
  • **Use whatever chili mixture you like. We aren't the biggest bean fans in our house, so we omit those. This recipe is so easy and versatile, it even works with beans.
  1. Preheat the oven to 400. To prepare a 8" pizza:
  2. Smear 2 tblsp of cream cheese around the crust evenly.
  3. Add 2 tblsp Pace Picante Salsa and 2 tblsp. Hormel Chili. Also spread evenly around the crust.
  4. Add green pepper pieces and jalapeno slices.
  5. Sprinkle 1/3-1/2 cup of shredded cheddar cheese all the way to the edges of the crust.
  6. Bake in the oven for 20-25 minute or until the cheese is browning and the bottom of the crust
  7. crisps up.
  8. !IMPORTANTE! Tha Pizza Cutta says, "LET COOL BEFORE CUTTING!" This pizza can be a little oozey, so let it cool at least 7-10 minutes before slicing it up.
  9. Serve to happy or really peeved football fans!


Friday, January 8, 2010

A Birthday Meal Fit for The King

Happy birthday to me! Happy birthday to me! Happy beeeerrrrrthday, happy birthday to me!

Today is my birthday foodies & foodettes and although I am flattered everyone out there wants to celebrate my birth, some folks might also be celebrating the birthday of the King of Rock and Roll, the one and only Elvis Presley. Yes it's true Elvis and I (and David Bowie) all share the same birthday. And yes, I am no where near as famous or influential as my birthday mate but perhaps I will be one day. Heck, I knew stars were in my future in the first grade when I approached my mom while she was blow drying her hair listening to Elvis on the radio on my seventh birthday and flatly said, "It's a shame Elvis didn't live to meet me." Commence stunning. Mom almost dropped the dryer in the sink over how assured I was that it would enrich Elvis Presley's life if he and I were acquainted. Oh boy was I precocious!


Hard to believe that moment was about twenty years ago. Did I just date myself? Eek! Oh well. As I was commuting home yesterday contemplating the next year of my life and my more-famous birthday counterpart, I was struck by a hunka-hunka burning inspiration to cook a Birthday Meal Fit for The King to celebrate the fact that we both have graced this earth. After a trip to the market and some extensive Internet searching of Elvis' favorite foods plus my southern food favorites, I finalized the honorary menu: Southern Fried Chicken, Savory Collard Greens, Cinnamon Cornbread, and The King & I Peanut Butter Custard.

Of course my research on Elvis' food choices began the design of each dish and then my personal food choices completed each dish. I may be a Yankee, but I am also an indoctrinated southerner giving rise to love of all things fried and real BBQ. Yet, I still cannot get down with grits. I'm sorry, to me grits will always be gruel I don't care how much butter and cheese you put in them. I am not enticed. Therefore there will not only be no grits, but there are also no bananas in a Birthday Meal Fit for The King. Everyone knows and loves the tale of Elvis' guilty pleasure being a fried banana and peanut butter sandwich. I, however, am allergic to bananas and I don't think The King wants to hang out with me just yet in the afterlife.

"Wise man say, only fools don't read recipes," so please continue on!


Southern Fried Chicken Tenderloins
Serving Size: 2
  • 6 large white meat chicken tenderloins
  • 1 1/2 cups buttermilk pancake mix
  • fried chicken batter seasoning*
  • 1 cup buttermilk
  • vegetable oil for frying
  • Sriarchi
  • *everyone's fried chicken seasoning is secret. I will tell you it involves at least salt, black pepper, paprika, and cumin.
  1. Make sure chicken tenderloins are dry.
  2. Bring your oil temperature in fryer up to 375 degrees. Preheat oven to 250 degrees.
  3. Pour buttermilk in one shallow bowl and have your flour +seasoning mixture in another shallow bowl.
  4. Dredge each tenderloin in the flour mixture, then in the buttermilk, and then again in the flour mixture. Be sure to let some buttermilk run-off before going through the flour a second time.
  5. Put battered tenderloin directly into fryer.
  6. Let each tenderloin fry 10-12 minutes or until a golden brown color is reached.
  7. After frying, let each tenderloin drain on paper towels. If you are still cooking and need to keep these warm while you prepare the rest of the meal, put the tenderloins on a lined baking sheet in the 250 oven until its time to eat.
  8. Because hot sauce and fried chicken are flavor besties, add your favorite hot sauce for the finishing touch! We love Sriarchi, so hot and yummy!

Cinnamon Cornbread

Serving Size, 9x4 cake pan
  • 1 cup flour
  • 1 cup cornmeal
  • 3/4 cup sugar
  • 1 teaspoon cinnamon
  • 1 teaspoon salt
  • 1 cup buttermilk
  • 1 egg
  • 1/3 vegetable oil
  1. Preheat oven to 400 degrees and generously grease cake pan with butter.
  2. In a bowl, combine all the dry ingredients well.
  3. Mix in egg, buttermilk, oil until well combined.
  4. Pour batter into greased cake pan.
  5. Bake for 23-25 minutes or until the top is golden brown.
  6. Let cool for 5 minutes in pan before cutting pieces.

Quick Savory Collard Greens
Serving Size: 2
  • 1/2 bunch of collard greens
  • 3 large garlic cloves, minced
  • 1 cup thinly sliced red onion straws
  • 1/2 chicken stock
  • olive oil
  • 1 tblsp. balsamic vinegar
  • salt & pepper
  • cumin
  • nutmeg
  1. Over medium heat in a large saucepan, heat olive oil.
  2. Add minced garlic and red onion straws and cook for 3-4 minutes.
  3. Add collard greens and let wilt for a few minutes.
  4. Season with salt, pepper, nutmeg and cumin.
  5. Add chicken stock and vinegar and bring to a simmer.
  6. Let simmer 5-7 minutes and serve.

The King & I Peanut Butter Custard
*This recipe is a work in progress. Admittedly, my custard did not set all the way yielding a consistency that I didn't think was custard-y enough. Stay tuned though for a post re-visiting this delicious dessert's recipe. *


PS - this is also L&S's 100th post. w00T! It's a celebration bitches!! I'm out. ^-^

Saturday, January 2, 2010

New Year Muses & Hazelnut Tiny Italian Cakes with Tangerine Cream Cheese Frosting

Alo Gorgeous! You beautiful new year, you! I'm zen for 2010. I'm at ease, I'm calm, and I'm ready for the next horizon. First posts of a new year traditionally include resolutions, so why should I go about making new waves? I am a believer in setting resolutions and materializing them into realized goals to enjoy the rewards from these personal achievements that will flow forth. Last year I made a few resolutions and I am proud to say, for the majority of 2009's "I will do's, " I was successful. I saved some money, paid off some debt, invested in my passions, excelled in my less strong areas at work, spent as much time with family as possible, mended some old wounds, and put my health in the priority number one spot. 2009 was also a year of wins and losses. For example, my brother and I video-auditioned for a Food Network show and were denied, but I attended an event and meet Iron Chef Cat Cora. I visited Julia Child's Kitchen Exhibit at The Smithsonian in Washington, D.C. after giving my first forty-five minute conference presentation (killed it might I add). I traveled to Vermont for a job interview in the food industry for a position in New York City and I didn't get the job, but I was able to see Vermont for the first time in addition to driving on an old school road trip with my big bro. PS-People still hitchhike there, for real. I was so dumbfounded I was gagging with laughter. For the cherry, the Vermont hitchhikers were shiny, happy, and smiling people with their hemp back packs and long pigtails! "Did we just do a time-wrap? I thought this was just a rental car..."

Tarbox Farm Stand in Upstate New York. We stopped there leaving VT. I purchased some large Dahlia's for my Aunt and Jeremy brought back some fresh provisions to his Brooklyn flat.


The mascot of The Tarbox Farm Stand.

I think in 2010 I'm going more general and free-form for my resolution, I want to take the last road traveled on the journey of self-discovery at all costs. Percentage-wise, I am about 75% aware of the being I should and am able to be, and I am bubbling with anticipation to face the last perilous 25%. Why perilous and why not joyous? Well, its kind of both, isn't it? After vanquishing a personal fear with utter dominance, your whole self will rejoice with triumph and victory. Hence, the interconnected emotional relationship of peril from fear and joy from eliminating that fear from your life forever. Maybe I'll make it to New York, or maybe I will finally start on that travel dream and spend serious time out of the country, or maybe I will do both or neither or something completely different. To be open is a freeing and thrilling thing.

What will not change in 2010 is feeding Laptops and Stovetops with my love of the culinary arts. And on that note, thank you, thank you, thank you so much to all my family and friends for their fabulous foodie gifts. I am so geared up for foodie fabulousness in 2010, it's truly not even funny. Pete my love hooked me up with a stellar light box for photographing the L&S food models, and a bevy of needed utensils like the bomb knife sharpener and a gangster all-black pizza cutter for Tha Pizza Cutta persona to ball-out with in 2010. Plus a garlic press (Oh the rapture of not having to mince garlic by hand!). Ah, thanks boo! His parents, the wonderful Triolo's gifted me with a humongous food basket pouring over with Italian delights like Sicilian White Wine, Loacker Tiramisu Wafers, canned sardines, spicy garlic, pepperdews, and much much more. I was so touched I almost cried.

iPhoto pic sent to my bro after receiving his gift of a handmade Honduran apron on Christmas day.


"Ima Cut you Pizza!" LOL! And that's all I have to say about that.

Add to that three aprons-one from my brother's trip to Honduras which means I'm international for sure-a set of white decorative plates, and a perfect brownie tray both from Pete's brother and his girlfriend. Katrina, Pete's brother's girlfriend, also had her friend create this caricature of me as Tha Pzza Cutta! Do you love it?!?! I also want to wish Katrina Good Luck! as she starts her term at The Miami Ad School after winning a prestigious full-ride scholarship. You better work! Last but not even near the least is all the encouragement gifts from these beautiful people represent to keep on growing, cooking, and posting! Can I measure my gratitude? Maybe not, but I hope I've showed and returned the love I received and will continue to do so through this whole new year.

In that vein of motivation, let's talk about cake and frosting now. :) Just before Christmas I was once again presented with our lab holiday party and a chance to bake. Using this opportunity I looked up a cake I was chomping at the bit to make since November, Bellalimento.com's Torta di Nuci or Italian for 'nut cake.'

Quick snap of the RETRO lab Holiday Potluck Extravaganza!

Of course I heart Italian food, but a detail of my love for Italian baked goods is the simpleness of their sweets. A few ingredients, a sincere flavor profile, and an un-complicated texture are strong notes that sing to my pallet and are ever present in the torta di nuci. For festive purposes, I piped a tangerine cream cheese frosting to ice it and a fresh cherry plus stem to top my Hazelnut Tiny Italian Cakes with Tangerine Cream Cheese Frosting. Without further lingering muses, here is my adaptation of the bellalimento.com recipe plus the frosting how-to.

Recipe: Hazelnut Tiny Italian Cakes
Serving: 12 cupcakes (tiny cakes) + 1 9 x4 Loaf Pan
  • 2/3 cup all-purpose flour
  • 1 stick + 1 tblsp. unsalted melted butter
  • 1 1/2 cups sugar
  • 4 eggs
  • 130 grams toasted, crushed hazelnuts
  • 50 grams chopped sugared dates
  1. Preheat to 375. Butter and flour cupcake pan and loaf pan.
  2. Beat sugar and eggs together until light and creamy. Slowly add the melted butter and flour and mix well but with a low setting on either a hand or stand mixer.
  3. Add the nuts and dates and fold them into the batter with a spatula.
  4. Fill each cupcake unit 3/4 full with batter and bake for 30-35 minutes. Put the rest in the loaf pan.
  5. Check after thirty minutes using a toothpick to test. The loaf pan may take a few minutes longer.
  6. Once baked, let cupcakes cool for 5-10 minutes in the pan and then using a butter knife remove the individual cakes to finish cooling on a rack.
Hazelnut Tiny Italian Cakes cooling.


Recipe: Tangerine Cream Cheese Frosting
Serving: 24 cupcakes

Ingredients for the tangerine cream cheese frosting. Please forgive the extract error. The recipe calls for and uses Lemon Extract, not the Vanilla.

The zest in tablespoon form.

Final stages of mixing the tangerine cream cheese frosting.
  • 8oz. softened cream cheese
  • 1 stick softened butter
  • 1 tsp. lemon extract
  • 1 tblsp. grated tangerine zest
  • 4 tblsp. tangerine juice
  • 5 cups confectioner's sugar
  1. Beat butter and cream cheese on medium together until creamy.
  2. Add zest, juice, and extract until combined.
  3. Gradually add the sugar 1 cup at a time. Mix sugar thoroughly before adding the next cup.
  4. Chill for 30 minutes to 1 hour.
  5. Once the tiny cakes are cooled, and frosting chilled, use a piping bag to ice the cakes, and lastly put the metaphorical and physical fresh cherry on top!
Slices of cake from the loaf pan, not frosted. Perfect for breakfast with an espresso.

All the pretty holiday Hazelnut Tiny Cupcakes iced, cherried, and all in a row!

Thursday, December 31, 2009

2009's Great Missed Dish #5 Spicy Asian Crab Cakes with Crispy Nori


Since I used 1/2 lb. of a 1lb. can of lump crab meat in the #4 Great Missed Dish of 2009, Crab Tomato & Butter Spaghetti Rigati, the other half needed just as much attention for a different culinary point of view. This dish all started while watching Mark Bittman's video on NYTimes.com for Crisp Nori Chips. I recently came into some Nori from the Foodbuzz Tastemaker Program with AsianFoodGrocer.com and this application looked fun and delicious. So, I set my mind to making the crispy nori as St. Bittman prescribed ,but my plate needed a meaty focal point using the leftover crab meat and staying with the Asian flavor theme. My Asian cooking skills are green at best, so I wanted to ride the line between East and West for a successful dish.What better way to fill up the meat quotient of a dish and bring the East and West together in food than with crab cakes?

Everybody loves crab cakes except people allergic to shellfish, of which there are none in my house hold. Hurrah! Anyway, I am a big fan of ChiliCheeseFries.net and when I read the recipe for Creole Crab Cakes with Cayenne Cream I was inspired to adapt this creole-flavored dish to a spicy Japanese flavor profile. Ok, I'll come clean. On a vacation to the Gulf of Mexico the Triolo family and I were out doing a little shopping when we came across The Spice & Tea Exchange at John's Pass Village in Madiera Beach. Naturally we went in and I went home to my delight with their Spicy Sampler. The sampler was composed of three house spice blends guaranteed to perk up your dishes! One of the three blends was the Togarashi Pepper, "Renowned Japanese pepper blend. A very flavorful, but very hot seasoning. Use as a zesty substitute for cayenne pepper." All of these thoughts, ingredients, and inspirations came together 2009's Great Missed Dish #5 Spicy Asian Crab Cakes with Crispy Nori.

I used the ChiliCheeseFries.net recipe as my template and went bananas with adaptations. Here is the recipe outcome to the best of my recollection:

Recipe
Servings: 2

For the crab cakes:
  • 1/2lb. lump crab meat
  • 3/4 cup chopped onion
  • 1/2 cup shredded carrot
  • 4 garlic cloves, chopped
  • 1/4 cup chopped flat parsley
  • 1 large egg
  • 1/2 cup bread crumbs + 1-2 tblsp as needed to form cakes
  • 1 cup vegetable oil + 2 tblsp.
  • 3 oz. sour cream
  • 2 tblsp. Togarashi Pepper Spice Blend
  • 2 teaspoons Sirarchi
  • 2 teaspoons Fish Sauce

For the cream:
  • 1 tblsp. butter
  • 1/2 cup heavy cream
  • 1 teaspoon Togarashi Pepper Spice Blend
  • 1 teaspoon chopped chives
  • 2 cloves chopped garlic
  • 2-3 tblsp. Sirarchi

For the Crispy Nori Chips: see Mark Bittman's video.


Directions
  1. In a large skillet over medium heat, heat up the 1/2 cup of the vegetable oil. Add the onions, carrots, and garlic. Cook for 5 minutes. Remove veg with a slotted spoon and let cool.
  2. In a food processor, add the egg, sour cream, fish sauce, Sirarchi, 1 tblsp. of Togarashi Pepper. Mix on low while adding the 2 tblsp. of vegetable oil in a slow stream to make a mayonnaise mixture.
  3. In a large bowl, mix the vegetables, mayo mixture, bread crumbs, and
  4. the last tblsp. of Togarashi Pepper. Fold in the crab meat and parsley. Form into patties, should yield 4-6.
  5. Heat the remaining oil in the same skillet you cooked the vegetables in over medium-high heat. Cook patties until browned on each side, about 5 minutes. Take off heat and transfer to a paper-toweled plate.
  6. For the cream, heat butter in a medium pan over medium heat. Add the garlic and cook for 3-4 minutes. Add the chives, Sirarchi, and Togarashi Pepper. Cook over medium heat to reduce by 1/2. Add the cream, bring to a boil, lower the heat, and reduce again by half.
  7. Serve with rice of course, and without the cream. :)


2009's Great Missed Dish #4 Crab Tomato & Butter Spaghetti Rigati

Can't stop the momentum now! We are on Great Missed Dish #4 of 2009, Crab Tomato & Butter Spaghetti Rigati. To begin this story we have to go back in time to my senior year of high school in Naples, FL. I moved to Naples from PA at sixteen to live with my Dad and spend some quality time with the Irish side, the large and loving Joyce family. After working for my Uncle Jimmy's lunch truck and catering business after school and on weekends as the general commissary slave doing everything from cleaning, to stocking, to catering, to cooking, to bringing the boss man his money at the close of every business day, I left the family biz for the greener pastures of busing tables at a local seafood joint gem, Cafe De Marco.

This job had its share of ups and downs. The restaurant was a converted home and was beyond cramped. Seriously, this place could easily be in Manhattan judging it solely on the non-existence of wiggle room for guests and staff alike. Plus, I had to wear a bow tie and cumber bum. Ugh, down definitely. But, the food, the food! The food was beyond magnificent. Cafe De Marco was my first working exposure to great food and it is still my measure of excellence for lobster bisque. If you are ever in Marco Island, FL you MUST stop by Cafe De Marco for Lobster Bisque, Jumbo Prawns, and the Cafe De Marco Puff. This dessert was so popular, people would call-in orders two, three, four to-go! You have to see this beast to believe it.

Of course eating the food was a major perk but reeking of it after work every day was a major bummer. While complaining at school that I should never have left my uncle's business because I constantly smell of seafood and I had to work NYE 2000 until 2AM (still a bit pissed about that), my friend Justin told me his job was hiring hostesses. Campiello's on 3rd Avenue is in the swanky, upscale beach neighborhood of Naples and I fell in love with the four-dining room, Tuscan-inspired restaurant instantaneously. It was fate. I was hired and our love affair began. Campiello's food took my recognizable Italian food and kicked it in the face with mega, fresh, modern flavors. Over the next year I came to know and love the indoor/outdoor bar and restaurant with two courtyards, a lounge, full open kitchen, and a store providing hand-made Italian goods from scarves to luggage. It felt as close to the best of Italy and Italian culture as I could get in Florida, and I drank up every last moment. As I moved from hostess to Maitre D', I also intimately came to know the Campiello food. Spicy calamari with a lemon aioli, homemade fresh everyday over-sized garlic potato chips, and the tomato basil crab linguine were and still are stellar and my favorite dishes.

Often while in college (the only reason I left Campiello's), I would consider dropping out just to go and work there again. Needless to day the restaurant has a huge place in my heart and when I can't make it there, I yearned most of all for the Linguine with Crab, Tomato, and Basil. Not one of their more complicated dishes, this pasta is packed with true and huge flavors of crab, tomato, basil, and butter. To me, it is simply sublime. I can salivate only over the thought of it. Fast-forward to present day and I am aching over this dish and this time I decided to do something about it-I'm going to make it myself.

Well, it wasn't just for me. I also wanted to show-off how good of a cook I've become over the past year so I planned my Crab Tomato & Butter Spaghetti Rigati as the main course for Pete and I's two year anniversary dinner. Knowing full well Pete can't eat a lot of tomato without serious agita, I went for it thinking I could use just enough tomato to where it wouldn't make this stomach explode and the dish would still be killer. Here is the vague recipe for yet again, I did not write this down.

Recipe
Serving : 2
  • 1/2 lb. Spaghetti Rigati
  • 1/2 lb. lump crab meat, fresh is preferred.
  • 1/2 lb. butter
  • 3-4 medium vine-ripened tomato
  • 1 medium sweet onion
  • 4 garlic cloves
  • 6-8 large basil leaves, chopped. Reserve smaller leaves for garnish.
  • Salt
  • Pepper
  1. Core and coarsely chop tomatoes. I did mine in the food processor. Set aside.
  2. Quarter onion, set aside.
  3. Begin melting butter in large saucepan over medium-low heat. Once the butter is melted add a handful of crab meat, a tablespoon of chopped basil, and onion quarters. Let cook about 5 minutes.
  4. Add chopped garlic cloves. Let cook another 2-3 minutes.
  5. Add the chopped tomatoes all at once. Turn heat up to medium. Let cook and reduce to a simmer for 5-7 more minutes.
  6. Start the water for the pasta. Add pasta when water begins to boil.
  7. Add the remainder of the crab meat and chopped basil to the tomato and butter sauce. Let cook another 4-5 minutes on a low simmer.
  8. Drain the pasta.
  9. Mix the sauce and pasta together, garnish with small basil leaves, and serve with grated pecorino romano cheese!

Upon a trip to Lombardi's Seafood in Winter Park, FL I was distraught to find all the fresh lump crab meat sold out! I had to settle for the canned version. Seaweed salad for the side, of course.


Chopped, fresh tomatoes.


Melted butter, onion quarters, crab meat, and basil for sauce starter.


Add the chopped, fresh tomatoes!


Let all the sauce goodness simmer together.


I am ready with my Spaghetti Rigati! Oh, and see my splatter-proof contraption? That inspired Pete to give me a splatter cover for Christmas. :)


In the end, my dish didn't pack the same flavor punch of Campiello's version but I have a pretty good idea why-fresh crab meat. Fresh crab meat and I think my version has a fighting chance with a few more minor, minor tweaks. Thankfully my expression of love was still shining through and Pete and I had a lovely anniversary.

2009's Great Missed Dish #3, Vanilla Terrier Cupcake Experiment

Note above is the outcome we attempted to replicate.

In continuation of my 2009 personal quest to experiment and explore the vast ocean of culinary knowledge, may I present the curious case of the Vanilla Terrier Cupcake Experiment. In late Fall I called up my darling friend Michelle Milu to see if she wanted to head to my place for some early Christmas baking. On the phone she did my offer one better explaining she needed to make terrier cupcakes as a gift to her girlfriend who was getting married the next day. The bride-to-be and fiance were intensely proud owners and lovers of terriers. Food to celebrate love cute doggies; how could I not want to help with that cupcake gift?!?!?

Once I heard the story I was absolutely sold diving straight in to the very deep pond that is pastry decorating. We discussed who had what in their pantry to accomplish this experiment/mission and shortly after Michelle showed up, cupcake cookbook Hello, Cupcake!, decorating implements, and mini-cupcake pan in-hand ready to throw-down. After chatting it up and deciding its best to order pizza first since decorating on an empty stomach is an awful and honestly ridiculous idea, we cracked Hello, Cupcake! waiting for delivery to see what exactly we were in for.

At first (post-pizza), I was all homemade all the way gun-ho Sally. "Make box cupcakes?! No, we will make our vanilla cupcakes from scratch!" "Use can frosting for decorating?!? No, we will make our own three flavors and colors of frosting with our four hands!" Looking back now on how incredulous my expectations were, I try to remember what in the hell was my motivation? Ah, yes I remember. It's important to keep working on your chops in all the are as you wish to excel even if failure is imminent.

Milu herself mixing up the vanilla cupcake batter.


Hello, Cupcake! suggested using the Ziploc bag to pipe the batter in a swirl formation into the muffin pans to achieve a flat-topped cupcake.


Peeking in the oven on the mini's and the regulars.


Baked up and golden delicious!

The homemade vanilla cupcake part was successful. They turned out golden and yummy! Our major issue was making homemade frosting firm enough and soft enough to pipe out of a Ziploc bag in the form of large sections of fur. Oh, as well as disburse evenly alternating colors of the frosting to also mimic the quality of fur inside the Ziploc-piping bags. My movements with the runny frosting were awkward and frantic. I might as well have been trying to play the bagpipes at a large Irish funeral. Our first frosting attempts melted away from shapes into sag nearly immediately looking like we set a poor terrier on fire and slowly let it deform.
Sadly, I have no photos of that horror but I have a few snaps of the frostings.

The milk chocolate frosting mixture being melted with butter.


Best shot I could grab of the vanilla butter cream frosting.


Pink sugar pressed into diagonally-cut mini marshmallows creates the cute and pointy ears.

In the end, we simply iced the top cupcakes and sprinkled it with coconut flakes for our fur. We did successfully make the marshmallow nose and ears, so yea for us! For the eyes we turned mini semi-sweet chocolate chips point side into the mini cupcake face to anchor them as sturdily as possible. Lastly, we cut tiny pieces of pink Laffy Taffy for the tongues. Our Vanilla White Terrier Cupcake experiment may not have looked like the model in the book, but our experiment was successful because we both learned A LOT about decorating and we accomplished our mission of baking and making cute as they are sweet terrier cupcakes. Santa origami contribution by my boyfriend, Orlando Tattoo Artist Pete. PS - this whole event took about 3 plus hours in case you think you can give this kitchen project a shot.

Our Snowy Terriers and Santa.